General concept
My idea for this website was quite simple - a low cost (or zero-cost) deployment using free services from global providers (like AWS, CloudFlare). The site itself does not need any server-side logic, so I decided to use one of static HTML website generators 🙂
Generator
I knew that I want a static HTML website, so quite naturally I needed a generator (assuming that I don’t want to write raw HTML/CSS/JS stuff). I was choosing between Pelican and Hugo. In general both of them take Markdown stuff and transform them into a static HTML/CSS/JS content (with a specified theme etc.). The choice was made by my laziness, because I simply looked at themes in both of these tools and selected Hugo, because I found this Papermod theme which I really liked 😄
Architecture
If you think about the journey that a HTTP requests make to actually display this website, then here it is:

The functions of each component are:
- CloudFlare
- caching whatever is possible (this is a static website, so it can be cached in 100%)
- protecting from malicious/abnormal traffic
- CloudFront
- acting as a gateway to S3 bucket
- redirecting direct calls to CloudFlare
- S3 Bucket
- storing website contents
You may wonder “why there are two Content Delivery Networks?”. Well.. I wanted to benefit from CloudFlare’s protection mechanisms and CloudFront’s native support for S3 authentication at the same time.
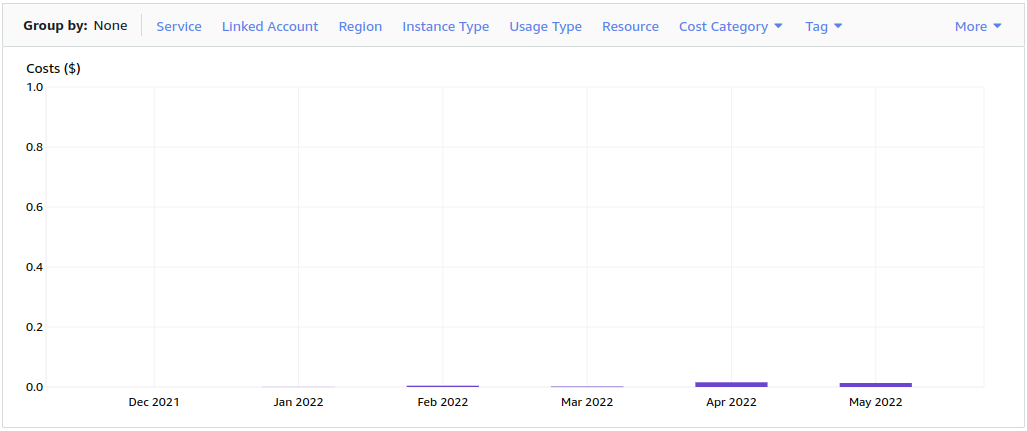
Cost
Technically running this website is… free:
- CloudFlare plan for personal use is $0/month,
- CloudFront has 1TB of data transfer, 10M of HTTP requests and 2M of CloudFront functions in Free Tier
- S3 has 5GB of storage, 20K GET requests and 100G of data transfer in Free Tier
Looking at the data above you know why protecting S3 access and caching whatever possible is so important in this architecture. As for May 2022 costs of this blog reached the maximum of $0.01 per month 😉
Creating S3 bucket
For the purpose of this website I needed a simple S3 bucket, so I created one with blocked public access:

I will skip Bucket Policy here, because it will be further discussed in section dedicated to CloudFront configuration.
Setting up CloudFront distribution
CloudFront distribution is, in general, an instance of CloudFront dedicated to cover some resources that are hosted on AWS. In this case, it will act as an access point for S3, because I didn’t want to expose S3 to the Internet (for obvious reasons) and CloudFront enabled me to set up Lambda function to verify if the request comes from right origin (I accept only CloudFlare IP address list).
CloudFront Origin
At the beginning of seting up a new CloudFront distribution, I needed to configure Origin. By Origin I mean the AWS resource that will be covered with CloudFront (e.g. S3 or ALB). So I
- picked my S3 bucket created before from the list in Origin domain field
- for Origin access selected
Origin access control settingsand created a newOrigin access controlsetting.
CloudFront Cache Behaviors
This section will tell CloudFront distribution how it should cache the requests. In general, caching will be done on CloudFlare level, so it should be disabled on CloudFront.
- in Viewer protocol policy select
Redirect HTTP to HTTPS - leave Allowed HTTP methods as
GET, HEAD - set Cache policy as
Caching disabled
Leave the rest of the cache settings on defaults.
CloudFront additional settings
Because I want the traffic to the website to be encrypted, a TLS certificate must be requested and set in Custom SSL certificate field. Because my Origin is S3 bucket, I have to set Default root object to index.html, so that requesting https://m4rt.pro/ means actually requesting https://m4rt.pro/index.html.
CloudFront Error Pages
After creating a CloudFront distribution, I went to Error pages tab in the distribution details and used Create custom error response. The goal was to prevent the ugly messages from S3 on every non-existing object. Yet S3 returns 403 status code instead of 404 (for security reasons), so I needed to apply the rule that looked as follows:
- HTTP error code is
403 - Customize error response set to
Yesand then- Response page path will be
/404.html - HTTP Response Code will be
404
- Response page path will be
Access Control Setting for CloudFront
In previous steps I’ve choosen Origin access control configuration for my CloudFront distribution. It means that CloudFront will use it to authenticate against my S3 bucket. But for now, all requests to S3 will be denied. From the CloudFront distribution details page I’ve choosen Origins tab end then edited the only origin in the list. Now in Bucket policy setting I clicked Copy policy to obtain a ready-to-use policy statement. This policy need to be applied to S3 bucket.
Then I went to my S3 bucket details page and selected Permissions tab. When editing the Bucket policy setting I updated the policy there with the one I copied before. The policy might look like this:
{
    "Version": "2008-10-17",
    "Id": "PolicyForCloudFrontPrivateContent",
    "Statement": [
        {
            "Sid": "AllowCloudFrontServicePrincipal",
            "Effect": "Allow",
            "Principal": {
                "Service": "cloudfront.amazonaws.com"
            },
            "Action": "s3:GetObject",
            "Resource": "arn:aws:s3:::MY_BUCKET_NAME_HERE/*",
            "Condition": {
                "StringEquals": {
                    "AWS:SourceArn": "arn:aws:cloudfront::MY_ACCOUNT_ID:distribution/MY_DISTRIBUTION_ID"
                }
            }
        }
    ]
}
Note: If I had some other policies already in place, I would need to merge them and save with multiple Statement objects.
Setting up CloudFlare proxy
I already had my domain covered with CloudFlare, so I didn’t onboard it now - here is an article that shows how to add a site to CloudFlare.
In terms of setting up CloudFlare as proxy for CloudFront distribution, the configuration was simple. It was enough to add a CNAME record in DNS with value from Distribution domain name. This name can be checked in CloudFront distribution detail page. Example domain name should look like this: xj45ghbgr9hg0.cloudfront.net
Protecting against direct calls to CloudFront
Because CloudFront caching is disabled, it needed to be protected against direct calls. This can be done by setting a CloudFront Functions. I created a new function i Functions (under CloudFront) with the following source:
function handler(event) {
    var request = event.request;
    var called_host = request.headers['host'].value;

    var redirect_url = '';
    if (called_host == 'MY_CLOUDFRONT_DOMAIN_HERE'){
        redirect_url = 'https://m4rt.pro/';
    } else {
        return request;
    }

    var response = {
        statusCode: 301,
        statusDescription: 'Found',
        headers: {
            location: {value: redirect_url}
        }
    };
    return response;
}
Later on I deployed that function by Behavior of my CloudFront distribution, associating my CloudFront function with Viewer Request event.
Final thoughts
Perhaps, after reading this article, you will decide to try this setup yourself. I have to warn you, that using cloud components might be expensive if you don’t set up apropriate measures to monitor your budgets. There is a really nice blog post from Troy Hunt about this 😉
Also, this is not a last word about this story - in next articles I will describe monitoring metrics and perhaps some protection mechanisms too - stay tuned 🙂
Finally, this setup does not have to be ideal - it’s just good for my needs. It’s definetly not the only way to setup a low-cost website on AWS, but just one of them all 😉